


Customising an Organisation form
How to customise the Organisation Form Layout, including adding, moving or hiding sections and controlling which tabs are displayed.
Tip
A quick way to create a new layout is to copy an existing one and make your required amendments.
Remember: you need to save any changes on the form creation landing page AND the window for the field you’re changing before the changes take effect!
By investing some time in planning how you want forms to appear, you can create a completely unique set of Workbooks records and it’s worth experimenting to test the effects of modifying existing layouts.
To help you get started, we’ve provided a worked example of a customised Organisation record. Of course, you’ll have different layout requirements but these instructions illustrate some of the possibilities.
The first screenshot below shows the default layout of an Organisation record without any Custom Fields. The fields are numbered to show which section of the form they appear in by default, as shown below the screenshot. The second screenshot shows a customised layout, including four Custom Fields. Details are provided below of how to customise the default form so that it looks like the second screenshot.
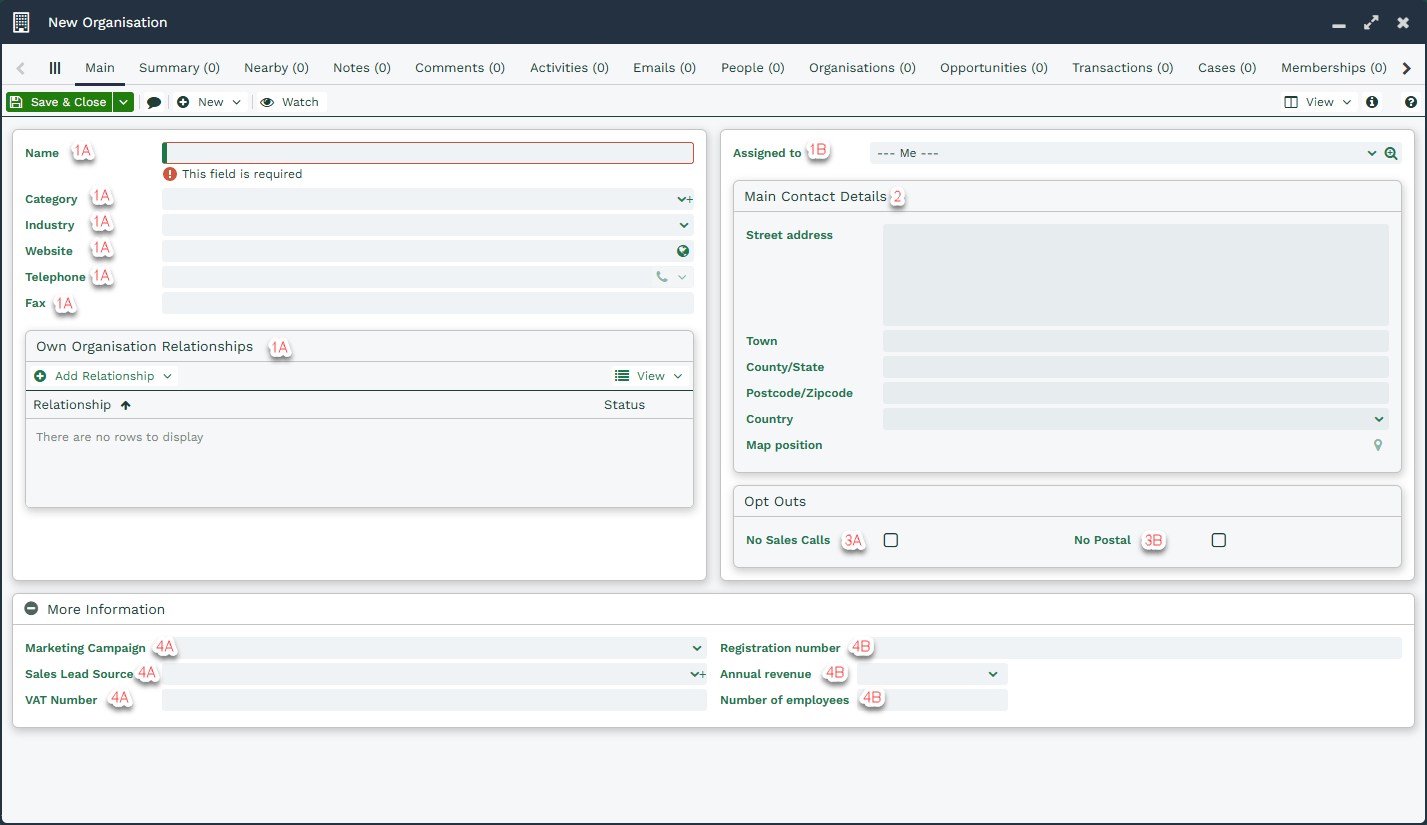
| Fields | Section |
| 1a | Main Form Column 1 |
| 1b | Main Form Column 2 |
| 2 | Main Contact Details |
| 3a | Opt Outs Column 1 |
| 3b | Opt Outs Column 2 |
| 4a | More Information Column 1 |
| 4b | More Information Column 2 |
Before starting to customise a form we recommend that you create any Picklists and Custom Fields that you want to use on the form. You can always add new ones later, if required.
Click here for more information on how to create Custom Fields.
To start your customisation click Start > Configuration > Customisation > Record Types and select Organisations from the grid on the right. Within the Form Layouts tab, click New Form Layout.
Give the layout a Name and Description.
Note
Do not include apostrophes in the naming of your Form Layouts. This will cause problems with the rendering of your Workbooks User Interface.
Customise the Sections
You can leave the Sections as they are, edit or hide them and/or add new Sections.
Add new Sections
1) Open the Sections tab and click Add new Section. Give the section a name. In this worked example, it’s called Company Name & Address. Select a Parent Section and Position. In this example, Main form column 1 and First. Tick Title & Border, select No next to Collapsible and enter the Title that you want to appear on the form. In this example we’ve used the same value as for the Section name, ie, Company Name & Address.
2) Add a second new Section called Company Information. Select Parent Section of Main form column 2 and Position First. Tick Title & Border, select No next to Collapsible and enter a Title of Company Information.
3) Add a third new Section called Contact Information. Select Parent Section of Form and Position After Main form column layout. Tick Title & Border, select No next to Collapsible and enter a Title of Contact Information.
4) Add a fourth new Section called Products. Select Parent Section of Main form column 2 and Position After Company Information. Tick Title & Border, select No next to Collapsible and enter a Title of Products.
Modify existing Sections
Open the Opt outs Section, change the Parent Section to Form and Position to After Contact Information.
Open the Opt outs column layout Section and change the Parent Section to Opt Outs.
Hide Sections
Open the Main Contact Details and More Information Sections and remove the ticks from the checkboxes next to Show.
Note
At the bottom of the Sections tab you’ll see a number of greyed out rows. These are the Sections that have been ‘hidden’ from this customised form layout by removing the tick from the checkbox next to Show. You can make these sections visible again by opening them and ticking the box next to Show.
Customise the Fields
All the Fields available for Organisations are listed in the Fields tab including the four Custom Fields created for this example. You can move fields from one Section to another, re-order them within a Section or hide them from view. You can change how a Field behaves by making it mandatory or read-only and enter a default value for it. These changes only apply in the context of the form you’re customising. You could create a different customised form where the Field behaves differently.
1) Open the Name Field and change the Section to Company Name & Address, position First.
2) Open the Industry Field and change the Section to Company Information, position First.
3) Open the Website Field and change the Section to Contact Information, position Last.
4) Open the Telephone Field and change the Section to Contact Information, position First.
5) Open the Fax Field, change the Section to Contact Information, position After Telephone.
6) Open the Assigned to Field, change the Section to Main form column 1, position First.
7) Open the Street Address, Town or City, County/State, Postcode/Zipcode and Country Fields, change their Section to Company Name & Address and their position to the order in which they are listed here (with Street Address being positioned after Name).
8) Open the Field for Year Established (remember, this is a custom Field added earlier), change the Section to Company Information, position After Industry.
9) Open the Field for SIC Code (remember, this is a custom Field added earlier), change the Section to Company Information, position After Year Established.
10) Open the Field for Primary Product (remember, this is a custom Field added earlier), change the Section to Products Column 1, position First.
11) Open the Field for Secondary Product (remember, this is a custom Field added earlier), change the Section to Products Column 2, position First.
12) Open the Field for Annual Revenue, change the Section to Company Information, position After Industry.
13) Open the Field for No. of Employees, change the Section to Company Information, position After Annual Revenue.
14) Open all of the following Fields and remove the tick from the Show checkbox: Create Activity, Partner, Supplier, Customer, Prospect, Campaign, Source, VAT Number and Registration number.
Note
At the bottom of the Fields tab you’ll see a number of greyed out rows. These are the fields that have been ‘hidden’ from this customised form layout by removing the tick from the checkbox next to Show.
Open the greyed-out row for Organisation Reference, check the box next to Show, change the Section to Main form column 2, Position First.
Note
This reference number is generated by Workbooks and cannot be changed by Users so it’s automatically displayed as Read-only.
Customise the Tabs
You can specify which Tabs appear on the form and the order in which they’re displayed.
Note
Be cautious when ‘hiding’ tabs. In this example, a User can still click New on the Main tab of an Organisation record and create a Note record, but once they saved it, they wouldn’t be able to open it from the Notes tab as that tab has been hidden.
Control which Tabs are displayed
Open the Tabs tab and in turn open each of the rows except Activities, Emails, People and Opportunities and remove the tick from the checkbox next to Show.
That completes the customisation of the appearance of the form but remember, in order to make this form available to Users you need to:
- Save the changes you’ve made by clicking the Save icon;
- Publish the form by ticking the checkbox next to Published;
- Share the form with the appropriate users by clicking the Sharing padlock icon. Users can have access to more than one version of the record, if appropriate.