Document Review Report
Prerequisite: This Report relies on Custom Fields that will only become available once the DocuSign Plugin has been installed and at least one Template has been created for the Record Type.
This post provides a step-by-step guide to allow you to build a Report so that you can review all of the DocuSign activity for a specific record type within Workbooks. From this Report, you will be able to build views that will allow you to have a better understanding of where documents are in your business process, better forecast figures, manage any payment issues and help manage your renewal process in greater detail.
The example Report we have built is based on Contracts, however the same calculations and views can be applied to any other record type where DocuSign is being used, with some minor tweaks for record specific naming conventions.

To build this Report go to Start > New > Report > Create a new blank report and select Customer Contracts.
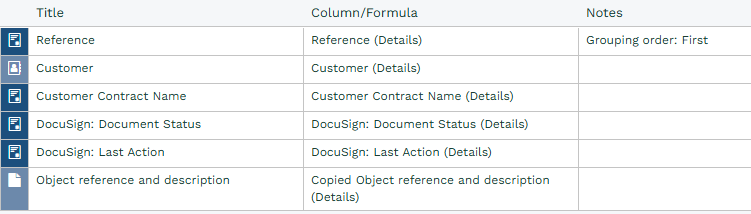
Add the following Fields to the Details of the Report:
Assigned to name
Customer
Document Date (Customer Contract Date, Order Date)
Customer Contract Date
Customer Contract Name
DocuSign: Copy Document on Signature
DocuSign: Copy Document to Type
DocuSign: Document Status
DocuSign: Last Action
Reference
Status
Updated at
Related Transaction Documents > Object Reference and description
Next, add the following calculated column and call it “Actioned since update”:
IF(cf_customer_contract_docusign_last_action >= updated_at, 'No','Yes')
This calculated column looks at whether the record has been updated since the last action in DocuSign allowing you see if any records are being neglected by your team.

Note
If you have configured a Primary Contact DLI that is used to link a Transaction Document to the person that signs the document then you may also want to include this within the Details and subsequent summaries.
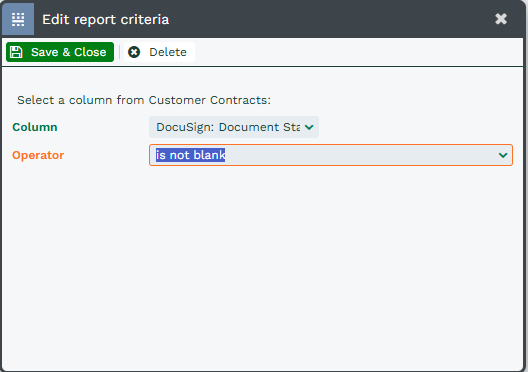
Add a single criterion to the report as shown:
DocuSign: Document Status is not blank
Once this has been completed you can now start to set up summary views for each of the DocuSign Document Statuses. Most of these Summary Views can be copied from one to another using the first as a starting point. Most only have amendments made to the criteria so this will be quicker than rebuilding the Summary View completely.
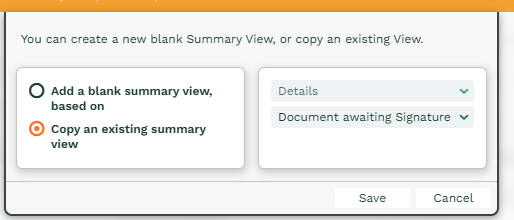
Summary 1 - Documents awaiting signature
This view looks at any Contract where the DocuSign: Document Status is not Document Signed, or a status that means the document has yet to be sent out. This View allows you to see any Contract that may not have been acknowledged (viewed) or signed by its recipient. It also includes a calculated column that allows you to see how many days since the document was updated in DocuSign.
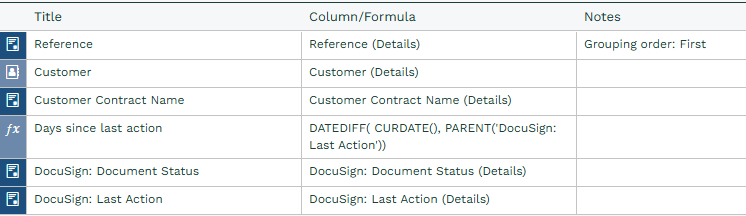
If you have included Line Item data in your report, create a Grouping Column using the Reference field – this will ensure that no Contracts are accidentally grouped together and there is no confusion in the data.
Once the grouping column has been created, add the following value columns:
Customer
Customer Contract Name
DocuSign: Document Status
DocuSign: Last Action
Next, use the below formula to create a calculated column called “Days since last action”
DATEDIFF( CURDATE(), PARENT('DocuSign: Last Action'))
This will show you the total number of days between today and when the last action on the document took place using the DocuSign: Last Action field created by the Plugin.
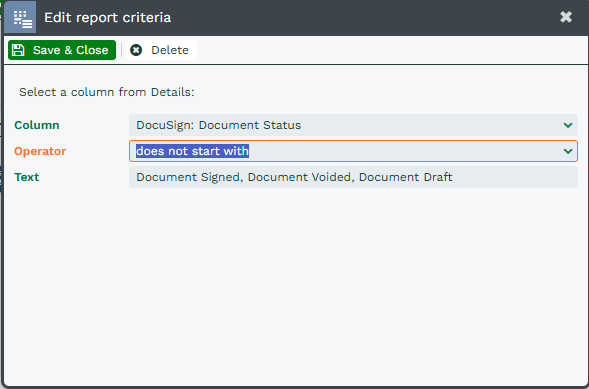
On the criteria tab for this view, add the following criteria:
DocuSign: Document Status does not start with Document Signed, Document Voided, Document Draft. This adds an “OR” criteria so the report looks for all statuses listed – you may not be interested in some of these so it can be tweaked to your needs.
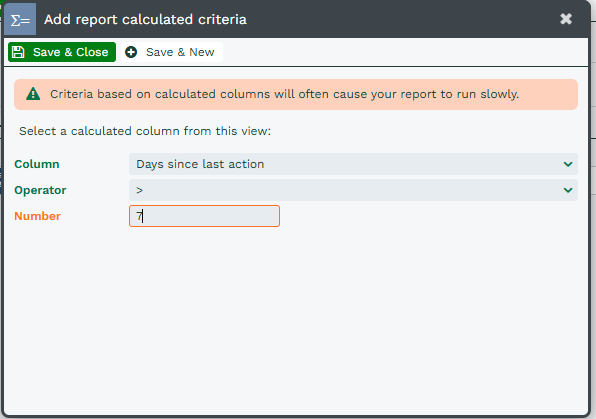
It is also possible to only show documents that have not been updated in a certain period of time, for example if you wanted to see Contracts that have been sent for signature (where a signature has not been received) over a week ago, you can add a calculated criteria of:
Days since last action > 7
Note
You may want to copy this view and add the criteria to the copied view, allowing you to have a view of all Documents that have been sent out and another view of the ones that need to be chased.
Summary 2 – Documents that have not been sent
This view looks at any Contract where the DocuSign: Document Status is at a stage which means that it has yet to be sent to DocuSign and may require internal review. Depending on your internal process, if you require draft Docusign documents to be reviewed before sending, this Report can help highlight which Contracts require attention.
Again, if you have Line Item information in your Report, create a Grouping Column using the Reference field – this will ensure that no Contracts are accidentally grouped together and there is no confusion in the data.
Once the grouping column has been created, add the following value columns:
Customer
Customer Contract Name
DocuSign: Document Status
DocuSign: Last Action

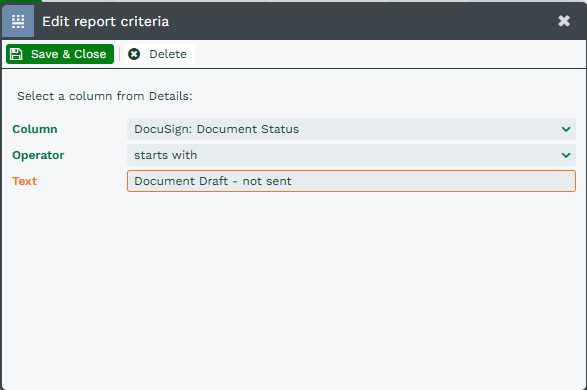
On the criteria tab, add the following criteria (or change the existing criteria if you copied the view):
DocuSign: Document Status starts with Document Draft – not sent
Summary 3 - Documents that have been voided
This view looks at any Contract where the DocuSign: Document Status is voided by sender, this means that a draft Document was created however it was cancelled by whoever generated it.
This will allow you to review any Documents that have been cancelled so that they can be reviewed by the relevant parties, it may be that it was voided by a manager and a discount needs to be negotiated before being sent out.
Again, if you have Line Item information in your Report, create a Grouping Column using the Reference field – this will ensure that no Contracts are accidentally grouped together and there is no confusion in the data.
Once the grouping column has been created, add the following value columns:
Customer
Customer Contract Name
DocuSign: Document Status
DocuSign: Last Action
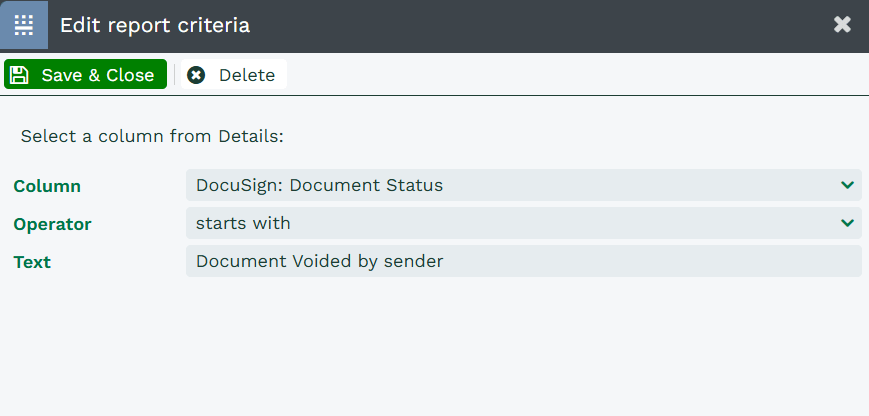
On the criteria tab, add the following criteria (or change the existing criteria if you copied the view):
DocuSign: Document Status starts with Document Voided by sender
Summary 4 – Signed Documents
This view looks at any Contract where the DocuSign: Document Status is Document Signed, meaning that the Document has been signed and returned by the recipient.
Note
If this was an Invoice Report and you are taking payments by DocuSign the Document Signed status means that payment has been made
This allows you to easily review all of the signed documents that have been received and progress the document to the next part of your business process. For example, if you were awaiting payment of an Invoice before adding a new Professional Services Case to a Queue to be delivered by another team.
Again, if you have Line Item information in your Report, create a Grouping Column using the Reference field – this will ensure that no Contracts are accidentally grouped together and there is no confusion in the data.
Once the grouping column has been created, add the following value columns:
Customer
Customer Contract Name
DocuSign: Document Status
DocuSign: Last Action
On the criteria tab for this view, add the following criteria (or change the existing criteria if you copied from another view):
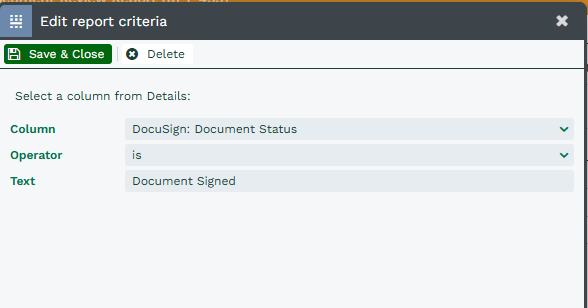
DocuSign: Document Status is Document Signed
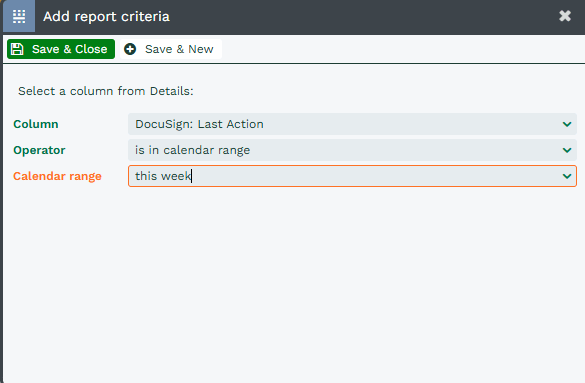
You may also want to consider creating a second View or adding an additional criteria to see Documents signed this week, this can be achieved with:
DocuSign: Last Action is in calendar range this week.
Summary 5 – Signed Documents with no action since signing
As with the previous view, this view looks at any Contract where the DocuSign: Document Status is Document Signed, meaning that the Document has been signed and returned. However, it will also look at where the Document has not been updated since receiving the signature.
This may mean that the user assigned who the document is assigned to is unaware of the changes, or this has not been picked up by the next stage of a process. This view is designed to help ensure that once a Document is signed the signer receives a prompt response and allows you to maintain a streamlined business process.
Again, if you have Line Item information in your Report, create a Grouping Column using the Reference field – this will ensure that no Contracts are accidentally grouped together and there is no confusion in the data.
Once the grouping column has been created, add the following value columns:
Customer
Customer Contract Name
DocuSign: Document Status
DocuSign: Last Action
On this view, add the following criteria (or change the existing criteria if you copied from another view):
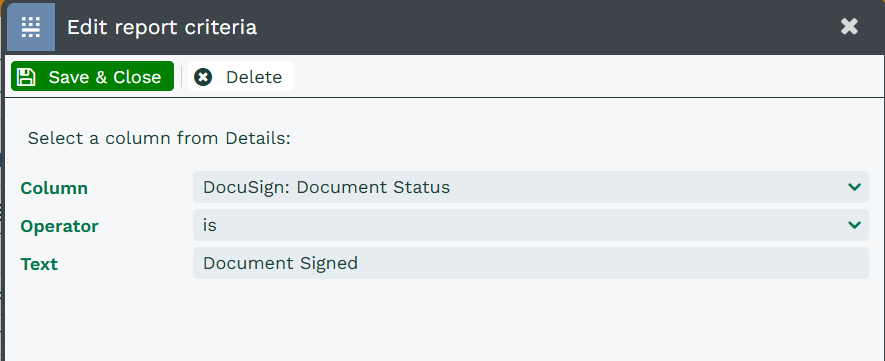
DocuSign: Document Status is Document Signed
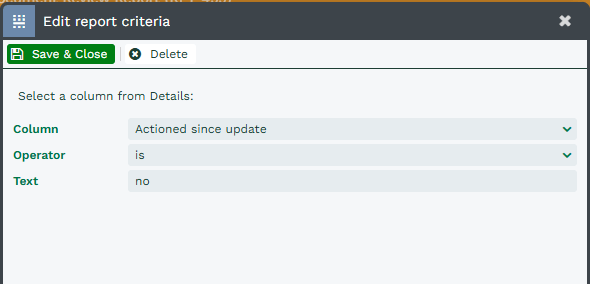
Action since update is no
Summary 6 – Documents created from DocuSign
This view looks at any Contract where a Document has been signed and returned and a second document has been generated from it using the automatic copy document feature. This View will show you the original Document as well as the newly created Document.
If you are using DocuSign as a part of an automated finance process, for example once an Invoice has been paid and received it should automatically be created as a Contract with all of the details from the Invoice copied across.
Again, if you have Line Item information in your Report, create a Grouping Column using the Reference field – this will ensure that no Contracts are accidentally grouped together and there is no confusion in the data.
Once the grouping column has been created add the following value columns:
Customer
Customer Contract Name
DocuSign: Document Status
DocuSign: Last Action
On this view, add the following criteria (or change the existing criteria if you copied from another view):
DocuSign: Document Status is Document Signed
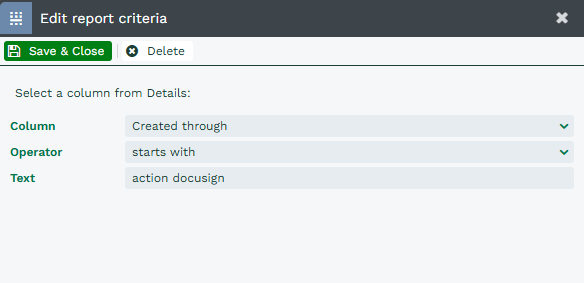
Created through starts with action docusign
This second criteria means that only Records that were created through a DocuSign process are displayed. This View will now allow you to see the details of the original Contract as well as the document that it was copied to.
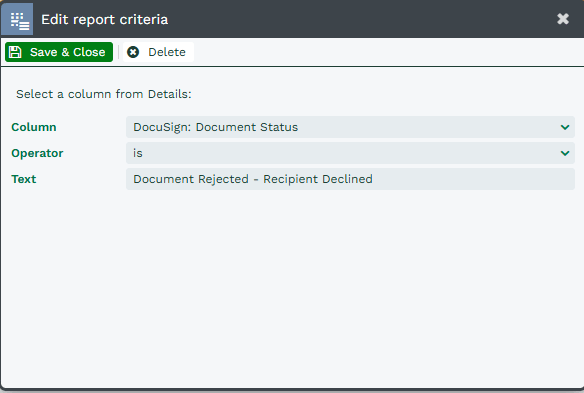
Summary 7 – Rejected Documents
This view looks at any Contract where the DocuSign: Document Status is Document Rejected, meaning that the Document has been received and reviewed by the contact, but have rejected it.
This allows you to stay on top of any documents and ensure that any issues are dealt with rapidly and the appropriate parties can be contacted in order to find out how best to progress.
Again, if you have Line Item information in your Report, set the Reference to be your Grouping Column, this will ensure that no Contracts are accidentally grouped together and there is no confusion in the data.
Once the grouping column has been created add the following value columns:
Customer
Customer Contract Name
DocuSign: Document Status
DocuSign: Last Action
Object reference and description
On this view, add the following criteria (or change the existing criteria if you copied from another view):
DocuSign: Document Status is Document Rejected – Recipient Declined