Kanban View for Opportunities
Kanban Overview
The Kanban View for Opportunity records offers users a way to more easily visualise, categorise, and update fields on Opportunities. Perhaps you’re a sales manager wishing to visualise and track the progress of sales across your sales team or across the sales pipeline. With Kanban view on Opportunities this is all possible. In Kanban view, records can be categorised according to any picklist field on the Opportunity record.
Note: Kanban View is only available to users with Pro Licenses (CRM/Business Pro) as well as those who have purchased the additional ‘Projects’ Extension.
Kanban view for Opportunities will allow users to:
- Categorise Opportunities by any picklist field on an Opportunity.
- Apply filters to limit the records shown in the Kanban (just as you would in grid view)
- Quickly update fields on an Opportunity by dragging and dropping records in different columns.
- Customise which fields are displayed on each Kanban entry.
- Expose/Hide specific columns from the Kanban.
Switching to Kanban View for Opportunities
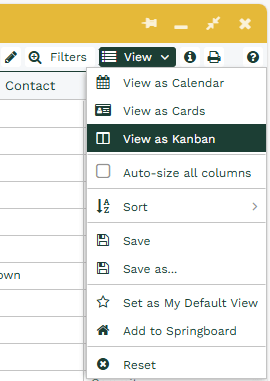
To switch to Kanban View, navigate to the ‘View’ button in the top right-hand corner of the Opportunities landing page and select ‘View as Kanban’ from the dropdown:
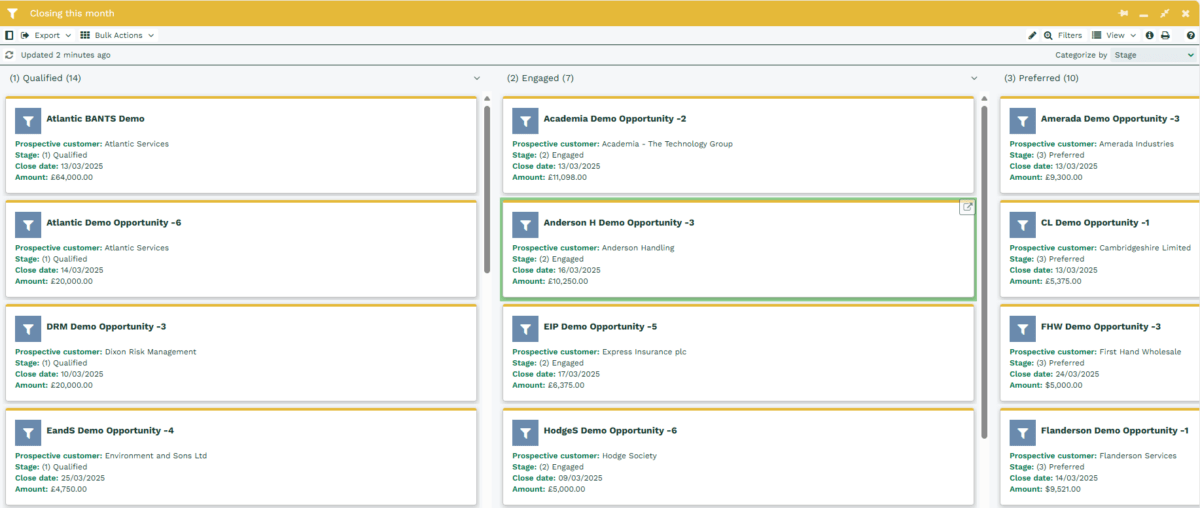
Note: When you first switch to Kanban View, Workbooks will split the Opportunities categorised by Stage.
Categorising your Kanban View
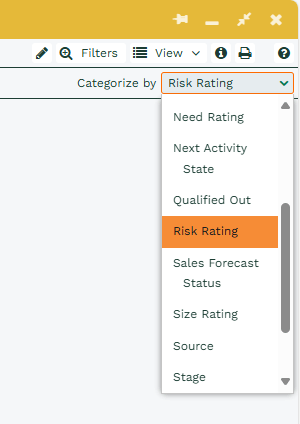
You can categorise the Kanban entries by any Picklist on the Opportunity record, such as Stage, Assigned to, and Close Period. To do this, navigate to the ‘Categorise by’ section in the top right-hand corner of the window and select any field from the dropdown.
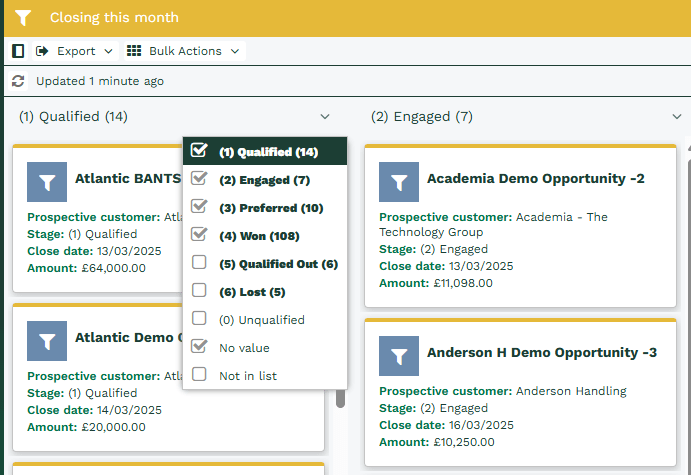
To restrict the categories which are displayed, for example if you only wanted to see Preferred and Won Opportunities, navigate to the top right-hand arrow on the top of any column and activate or deactivate any category.
Note: When updating an Opportunity to a new Opportunity Stage or Sales Forecast Status, it will adopt the standard probability for that stage. If it is moved to a stage or status it was previously at, it will adopt the probability it previously had at that stage or status.
Note: Categorising by ‘Close Period’ will display the current and next 6 accounting periods. When updating the ‘Close Period’, it will also update the ‘Close Date’ to the corresponding end date of the Accounting Period. If it is moved to a period it was previously at, it will adopt the date it previously had at that period.
Updating fields using Kanban View
One of the main benefits of Kanban View is the ability to quickly action and visualise field changes to different Opportunities. For example, a sales manager may wish to carry out sales pipeline management and quickly prioritise Opportunities and visualise the statuses of Opportunities in their sales pipeline.
You can do this by clicking on the ‘pencil’ icon next to the ‘Filters’ button on the right-hand side of the window. This will then expose a ‘Save’ and ‘Undo’ button, and you will then be able to drag and drop different Opportunities into the different columns. Once you are happy with your changes, you can then choose to keep them by clicking the ‘Save’ button or undo them by clicking on the ‘Undo all’ button. Opportunities that have been edited will have a green arrow in the top right corner of the card.
Note: If you have custom validation on Opportunities, you will not be able to save the opportunities that have been dragged and dropped into the categories to which the custom validation applies. For example, if you are required to fill in a closed reason when you set an Opportunity to a stage of closed, after dragging and dropping an Opportunity into the ‘Closed’ category, you will not be able to save it.
Applying filters to Kanban View
Kanban View for Opportunities also allows you to add filters, just like you were in the default grid view. Perhaps you are wanting to narrow down the Opportunities further from the example above, and just wanted to see Opportunities in Stage (3) Preferred and Stage (4) Won, as well as being assigned to Anthony Khan.
Customising the Kanban Entry Display
By default, Kanban Entries for Opportunity records will display four fields: Prospective Customer, Stage, Close date, and Amount. However, you may wish to enhance these entries, by adding additional fields or even a photo. To do this, users will need to navigate to ‘View’ in the top-right hand corner of the window and select ‘Configure View’ from the drop down.
Having selected this, a new window will pop up from which the user can customise the available fields and the Kanban entry’s/card’s design. In this window, on the bottom right, there will be a list of the available fields on Opportunities, where users can drag and drop fields onto the card template in their desired location. In the example below, you can see the ‘Type’ field and ‘Assigned To’ being dragged from the ‘Available fields’ section to the card template.
There are many different fields that can be used from the Opportunity record to customise your Kanban cards to show the information you need to see. Some of these available fields consist of:
Updated at: When the Opportunity was last updated.
Next Activity State: Shows a status of Closed, No Activity Scheduled, Follow-up Scheduled and Overdue with appropriate colouring to highlight the state.
Next Activity Scheduled: Shows the scheduled Date or Date/Time of the Activity on any Opportunities that have a Follow-up or Overdue Activity.
Lost Reason: Why was the opportunity lost
To customise the layout of the Kanban cards, there are a number of different template designs from which you can choose from. The layout can be changed by clicking into the ‘Card design’ dropdown on the top right-hand side of the window and selecting any option. For example, the image below shows how the ‘Single Card with Image’ design looks.
Showing Summarised Currency, Date, and Number Columns
Within Kanban view, it is also possible to display different summaries for the number, currency and date fields of each category. These will be displayed at the top of the view, just below each heading. In the image below, as an example it shows the total value of all the Opportunities for each stage.
Note: When dealing with totals on currency fields, ensure that all values are in the same currency, otherwise you will see a ‘Multi-currency’ message in place of the desired amount.
To configure totals, navigate to the Kanban Entry/Card customisation window, as described in the previous section. Following this, tick the ‘Show grand totals within the view’ checkbox in the top left-hand corner of the window. Then, select the desired field that you wish to summarise and click the ‘Display summary’ checkbox. From the summary drop down, select how you wish to summarise the field. In this example I have chosen to display the total Net amount ( Home currency) and Weighted Value (Home Currency) for all Opportunities of each stage. Finally, click on ‘Update’ and the summaries will automatically be displayed.